[Deprecated] Breakout Button
Breakout Buttons let you control user movement in a space. They are very powerful and can be configured to do many different things related to moving users.
They can be used for creating temporary breakout rooms, moving users from one room to another, or moving users from one participant slot to another.
Breakout buttons will often be in the Notes and Controls section so only admins and directors can push them, to control the flow of an event. However, you can also put breakout buttons into the canvas and allow any user to push them.
The breakout button can be configured by clicking the pencil on the Config property.

There are 4 different modes of the breakout button:
Temporary - New Rooms
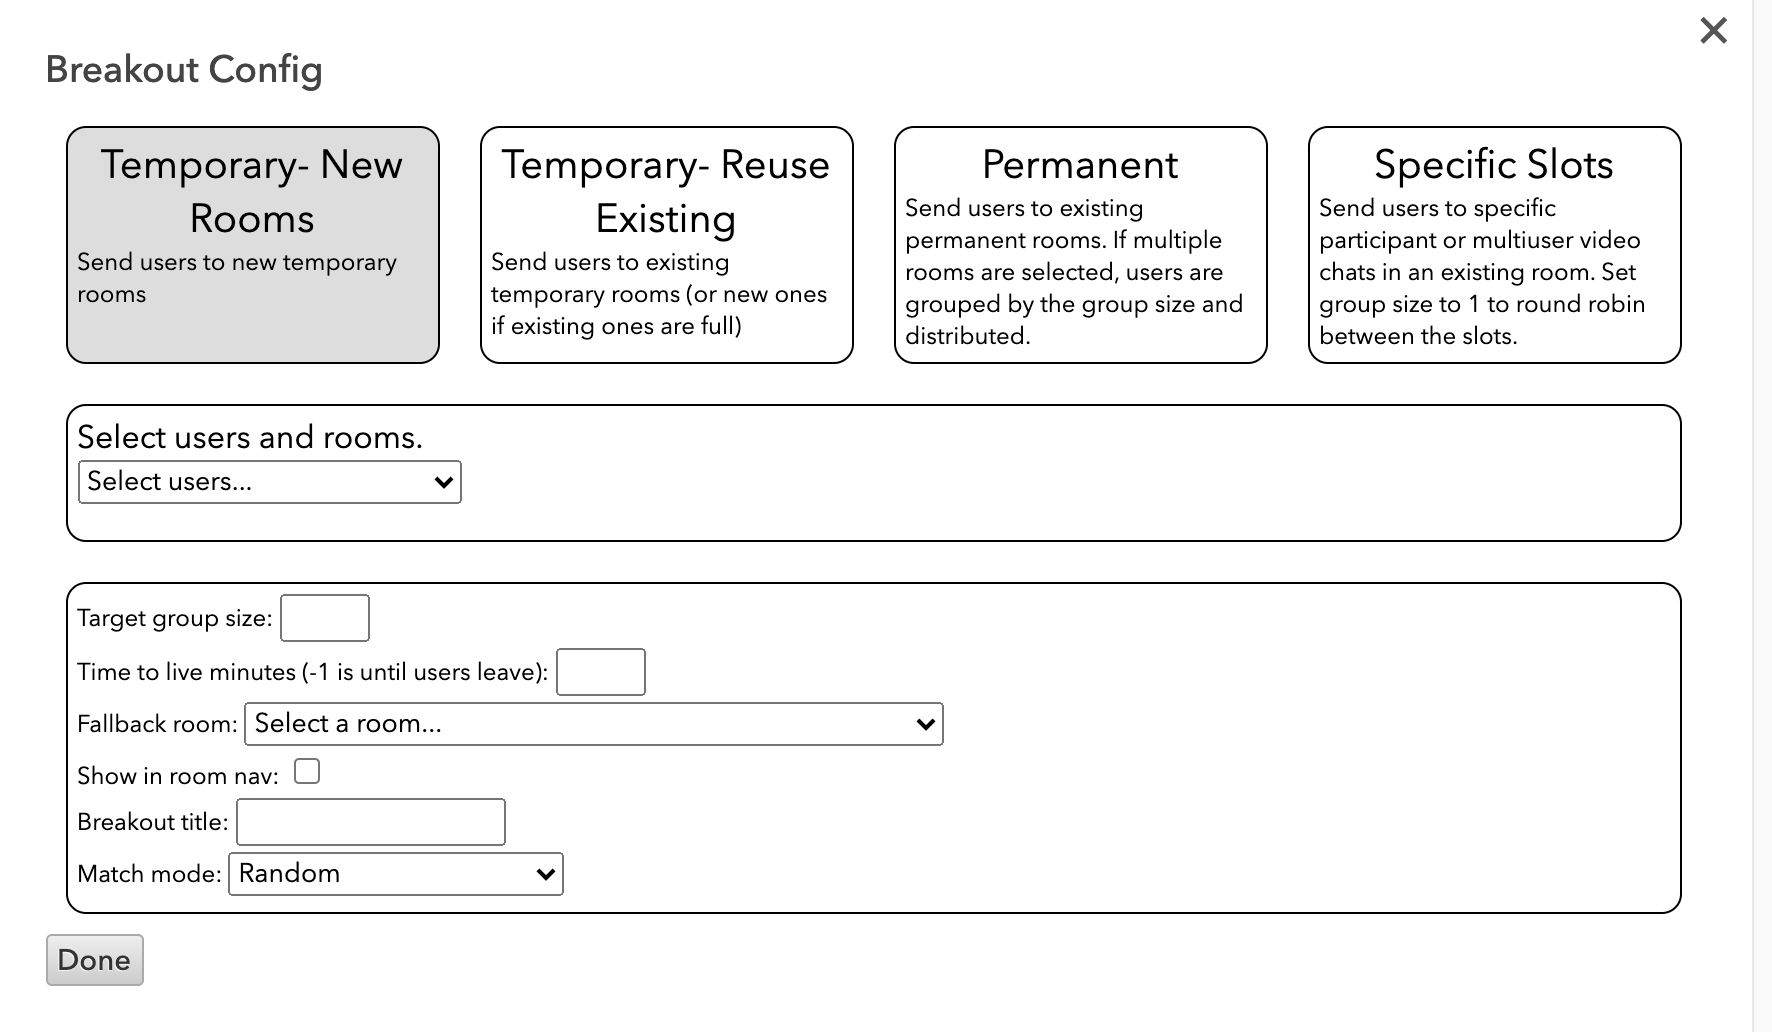
This mode will create new temporary rooms, and move certain users into those new rooms. The rooms will expire and be auto-deleted either after a certain amount of time, or after they are empty. In the middle section, you specify the set of users and the set of rooms. See Selecting Users.
The options are as follows:
-
Target group size.
This determines how many people will be placed in each room. If the target group size is 2, and there are 10 users that are selected, then 5 temporary rooms will be created, and 2 people will be placed in each one. If there are 11 people, 6 rooms will be created and one person will be by themselves. (Note: if you leave this blank, the default group size is 3). -
Time to live minutes.
This determines if the newly created rooms will expire after a certain amount of time, or exist until everyone leaves the room (at which time they will be automatically deleted). If the box is left empty, or set to -1, then the room will exist until everyone in it leaves. If it is set to a number greater than 0, the room will be deleted after that many minutes, and all the users in that room will be automatically moved to the Fallback Room. You can safely leave this blank. -
Fallback room.
Only relevant if "time to live" is set. If so, this is the room that users will be moved to if they are in a temporary room that is deleted by the system after a certain amount of time. -
Show in room nav.
Controls whether or not the newly created room will appear in the room navigation list (if room nav is enabled). It will only appear for users who are placed into that room, not all users. -
Breakout title.
The title of the temporary room. (Note: you can use$iin your title and it will be replaced by a number - for example, "Breakout 1", "Breakout 2", etc.) -
Match mode.
This can be "Random", "Prefer new partners", or "Prefer previous partners". This lets you match people with the same groups (if you have multiple breakout sessions and you want the groups to stick together), or new groups (a round-robin mixer style), or just a random set. The "history" is only per-breakout button; if you have two breakout buttons, the second button won't remember the previous partners that were made in the first button.
Temporary - Reuse Existing

Reuse existing is similar to "Temporary- New Rooms", but differs in that it will try to reuse existing breakout rooms if possible. All the options are the same as "Temporary- New Rooms."
As an example, let's say you have a Lobby room where everyone meets, and you want to break your students into groups of 4 to discuss a problem. You configure a breakout button to be a "Temporary- Reuse Existing", with a group size of 4, that moves all users in the Lobby room. There are 10 students in the Lobby when you hit the button for the first time. 3 breakout rooms will be created (Breakout 1 with 4 users, Breakout 2 with 4 users, and Breakout 3 with 2 users). Then let's say 5 new students show up in the lobby while the other breakouts are going on, and you want to send them to breakouts. Since your button is "Reuse Existing", it will put 2 of the 5 into the existing Breakout 3 room, and the other 3 into a newly-created Breakout 4 room. If instead, you had used a "Temporary- New Rooms", then it would create two new rooms, Breakout 4 and Breakout 5, and put 3 and 2 users in them respectively.
"Temporary- Reuse Existing" can also be used to let users break into groups themselves by clicking a button. For example, you can configure a breakout button that the users themselves can click, and set the user selector to "User who clicked the button". Say the target group size is "2". Then, the first user who clicks the button will go to a newly-created room Breakout 1. The next user who clicks it will go into Breakout 1 and be paired with the first user. The next user who clicks will go into a newly-created room Breakout 2. The next user who clicks will go into Breakout 2, and so on and so forth.
Permanent
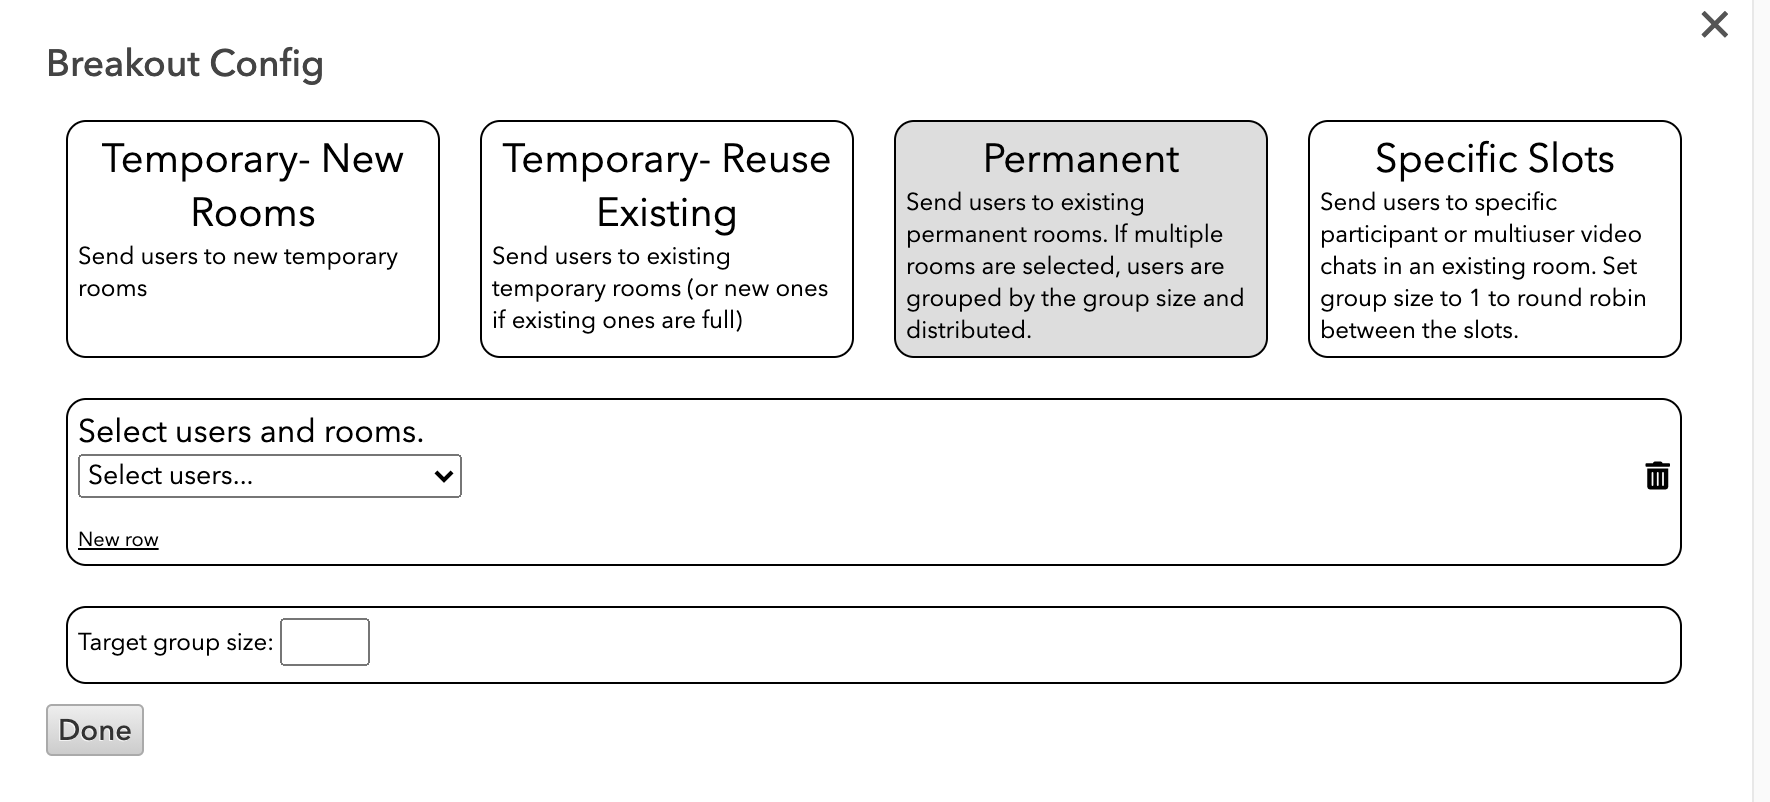
Permanent mode is used to send certain users into specific existing rooms. You can send one or more users into one or more rooms.
One room
If you specify one room, all the selected users will be moved to that room.
Multiple Rooms
If you specify multiple rooms, the users will be distributed among them subject to the target group size option. If target group size is 0 or blank, each user will be put into a random room. If target group size is 1, the users will be round-robined between the rooms. If target group size is 2 or more, the breakout button will attempt to respect this size when distributing users. For example, you might specify moving all users to Rooms 1-10 with a group size of 5. The breakout button will attempt to fill up all the rooms until they each reach a size of 5, and then distribute the remainder of the users evenly.
Multiple Rows
In permanent mode, you can specify "multiple rows". For example, the following configuration has 3 rows:
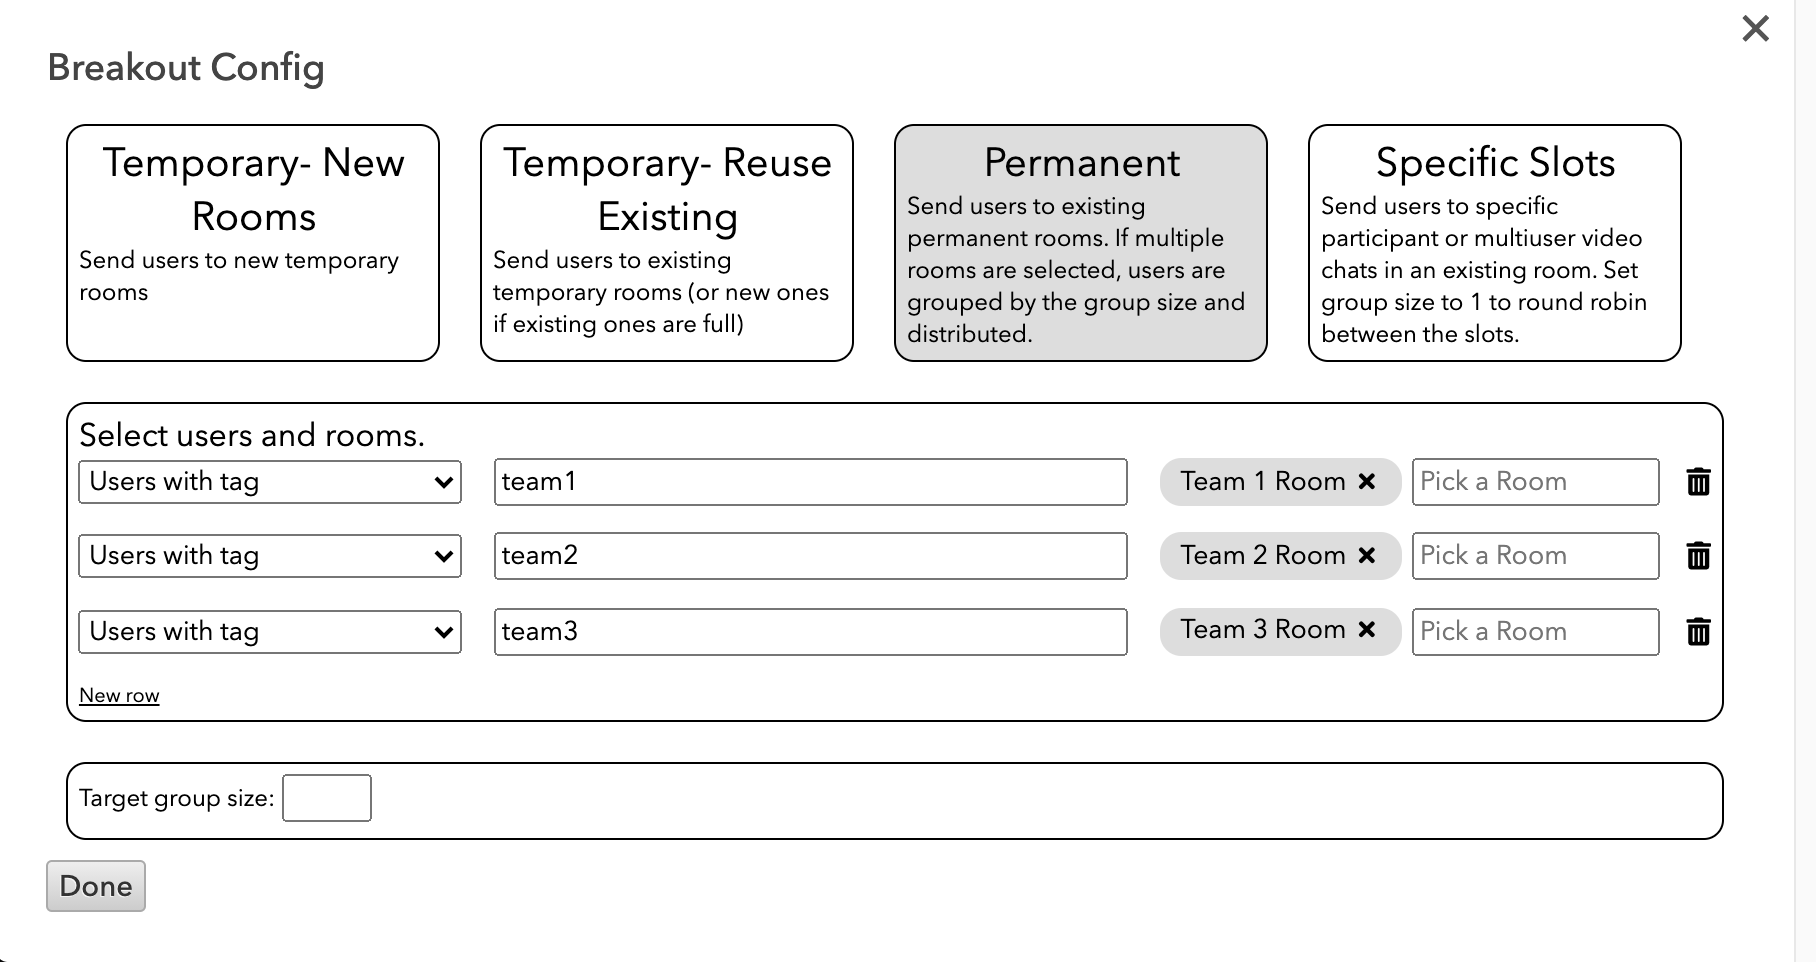
This breakout button will send all users tagged with "team1" to the Team 1 Room, users tagged with "team2" to the Team 2 Room, and users tagged with "team3" to the Team 3 Room.
Linking to a room
You can use the breakout button to send the user who clicked the link to a specific room, but if you are just trying to make a simple link, it's easier to use a text element or image element and set the "Linked Room" property to the room you want to link to.
Specific Slots
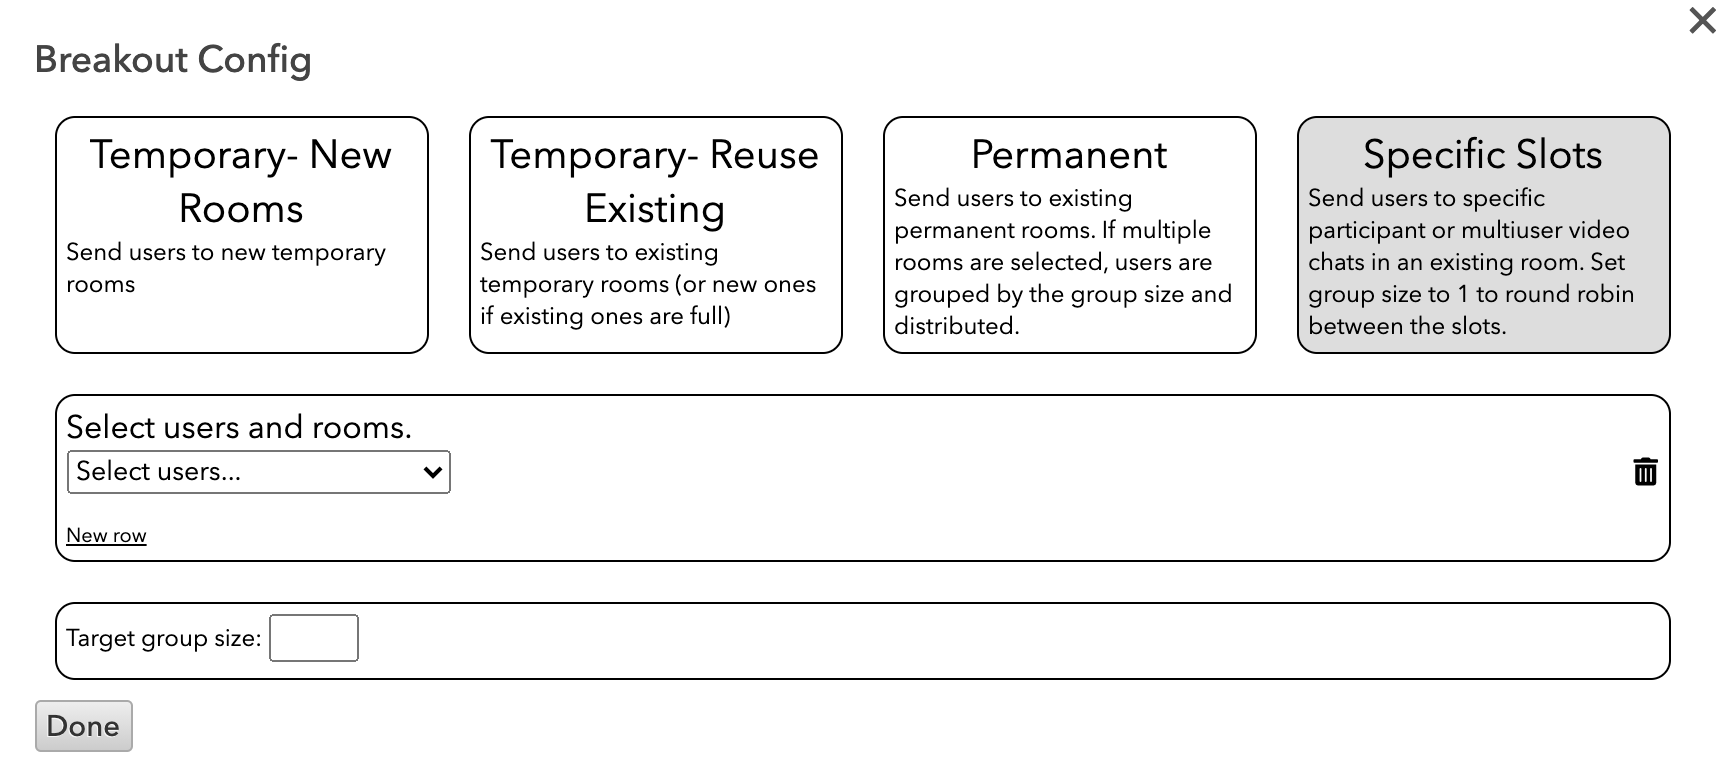
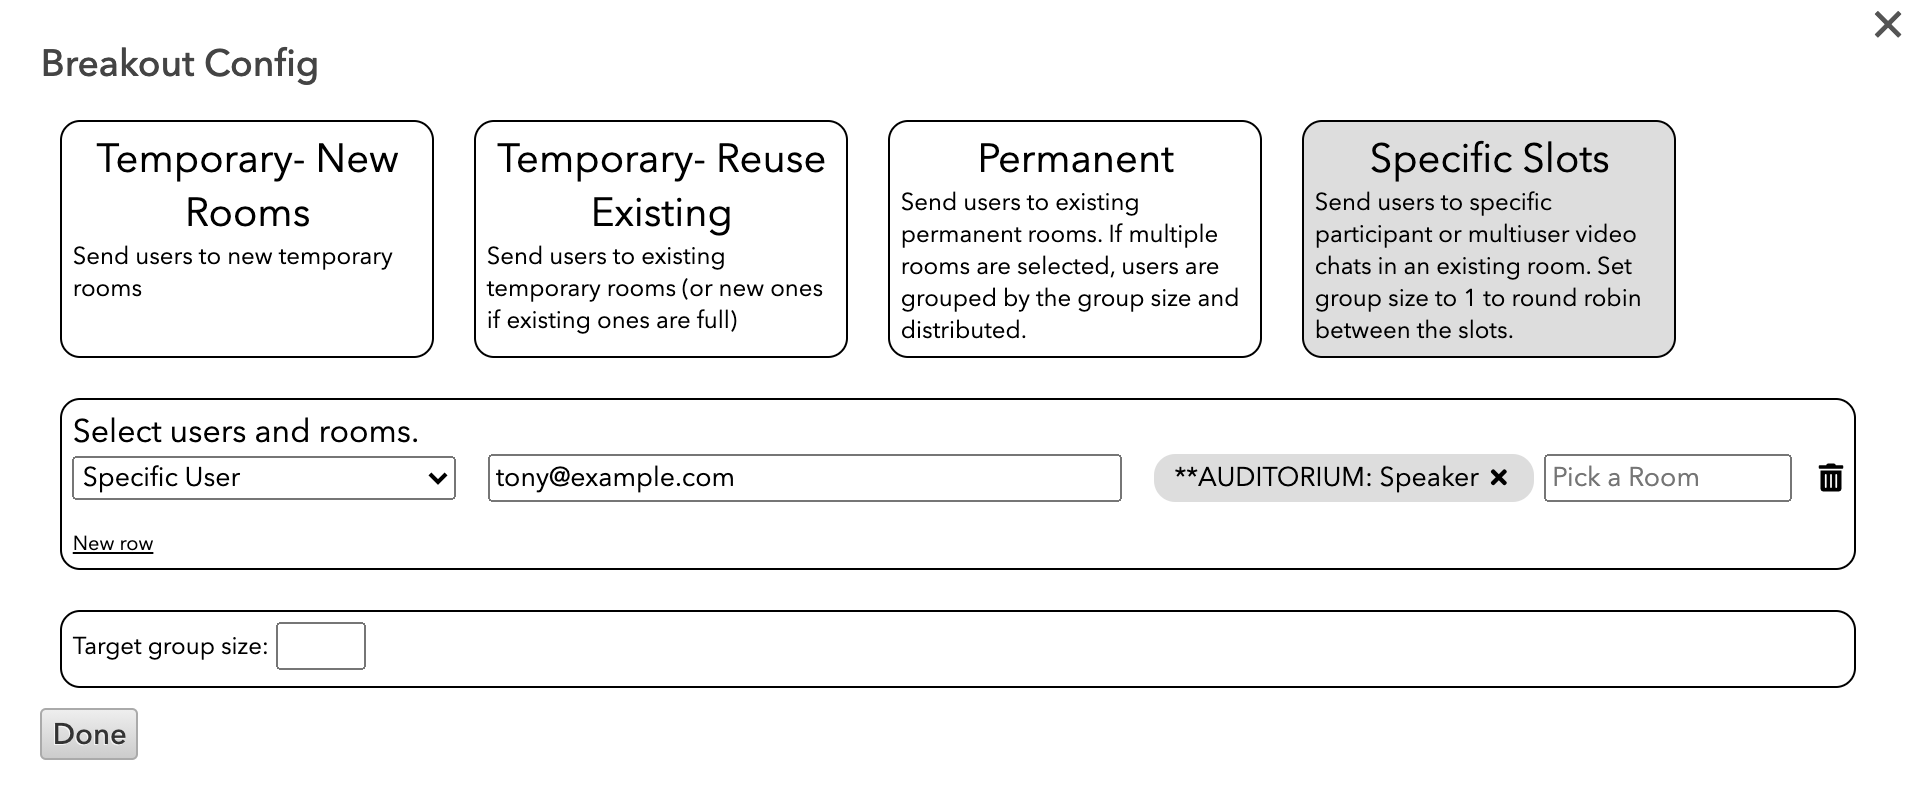
Specific Slots is similar to "Permanent", but instead of moving users to a room, it moves them to a specific slot (participant or multi-user video chat element) in a room. This can be very useful for moving a specific speaker into the speaker slot, for example. In the following configuration, the breakout will move the [email protected] user into the "Speaker" participant element in the Auditorium room. This will work whether or not Tony is in the auditorium (it will move him to that room if he is not already there).
Special ~Room~ Slot
There is a special entry in each room called ~Room~. If you choose this, the user(s) will be moved into that room if they are not in the room already. If they are in the room, it will unassign them from their current slot. The system may then decide to auto-assign them somewhere else. A common use case for this is if you have a manual multi-user video chat element for "Presenters", and you wish to have a button that will simultaneously remove anyone who is currently in the Presenters slot, and move one or more other users into it. You can achieve that with the following configuration:
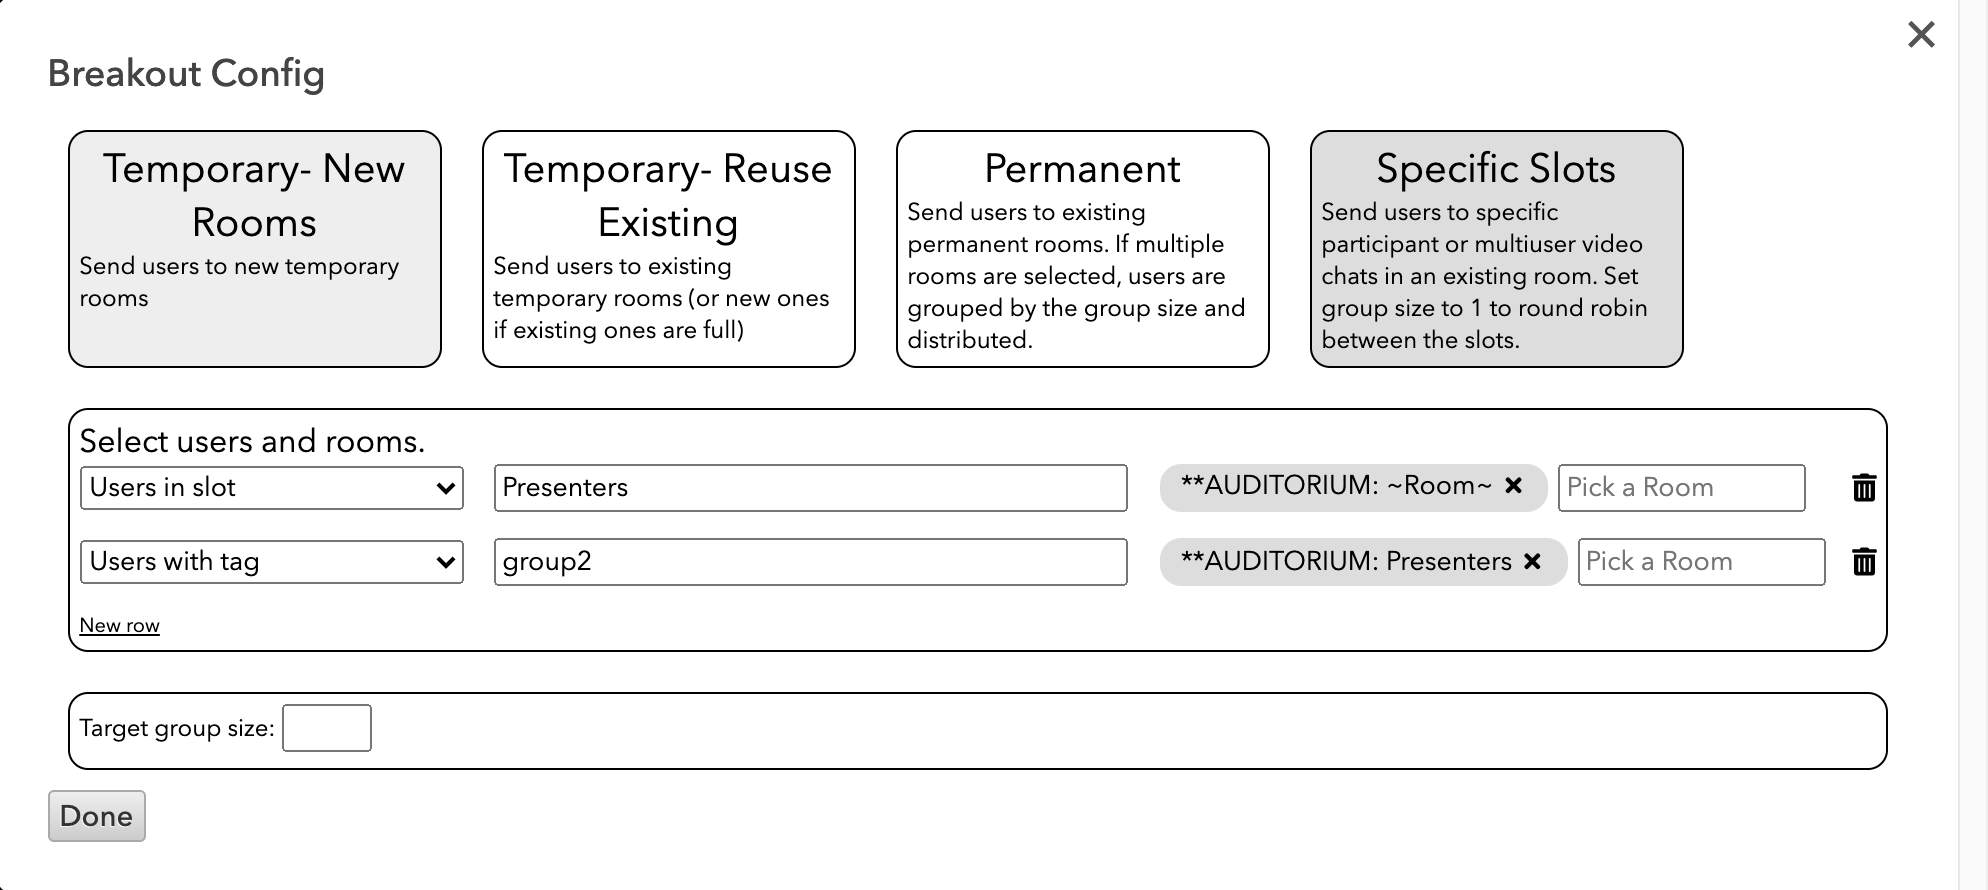
In this example, the first row will move all users who are currently in the Presenters slot to the special ~Room~ in Auditorium - this will remove them from the Presenters slot and they will move back to the audience. In the second row, we move users with the "group2" tag into the Presenters slot.
Selecting Users
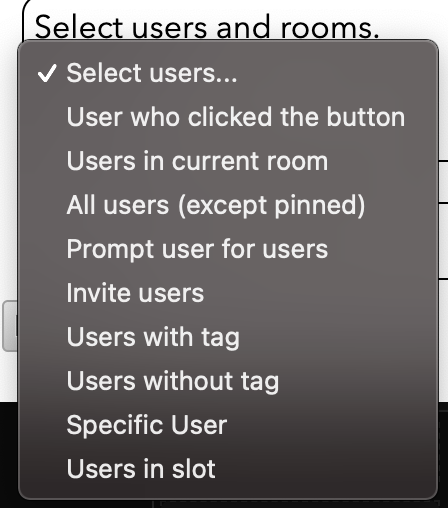
In all breakout buttons, you need to specify which users to move. There are a number of options to choose from:
-
User who clicked the button
Moves whichever users click the button. Typically the button will be on the main canvas where users can push it. Note that buttons can also be images. -
Users in current room
Moves all users who are in the current room, except pinned users. Note that the "current room" is the room that the breakout button is in (it may be different from the room the user is in if the breakout button is inside a room preview). -
All users (except pinned)
Moves all users in the entire workspace, except those that are pinned. -
Prompt user for users
Whoever clicks the breakout button will get a popup dialog where they can pick the users they wish to move. -
Invite users
Similar to "prompt". The user who clicks the button will get a popup dialog where they can pick users, but those users will get a notification asking if they wish to accept the invite. If yes, they will be moved by the breakout button. -
Users with tag
All users that have the specified tag will be moved (except pinned users). -
Users without tag
All users that do not have the specified tag will be moved (except pinned users). -
Specific User
You can specify an email address, and only that user will be moved. Note - tags are preferred as sometimes users may come in with a different email address. -
Users in slot
You can specify a "slot" (participant element or multi-user video chat). All users who are currently assigned to that slot will be moved.
Bring All Here
To bring all of your guests to one room, follow the instructions below.
Add your breakout button:
- Click on the breakout button icon 🔀 on the top of your screen.
- Drag your button into the "Notes and Controls" panel below, so only you and your event directors will be able to see it.
- Click on the button to bring up its settings in the right-hand panel.
- Name your button in the text box next to "Text" in the "Element" section of your right-hand settings.
Configure your "Bring All Here" button:
- Click on the pen icon next to "Config" in the "Element" section to open up the button's configuration.
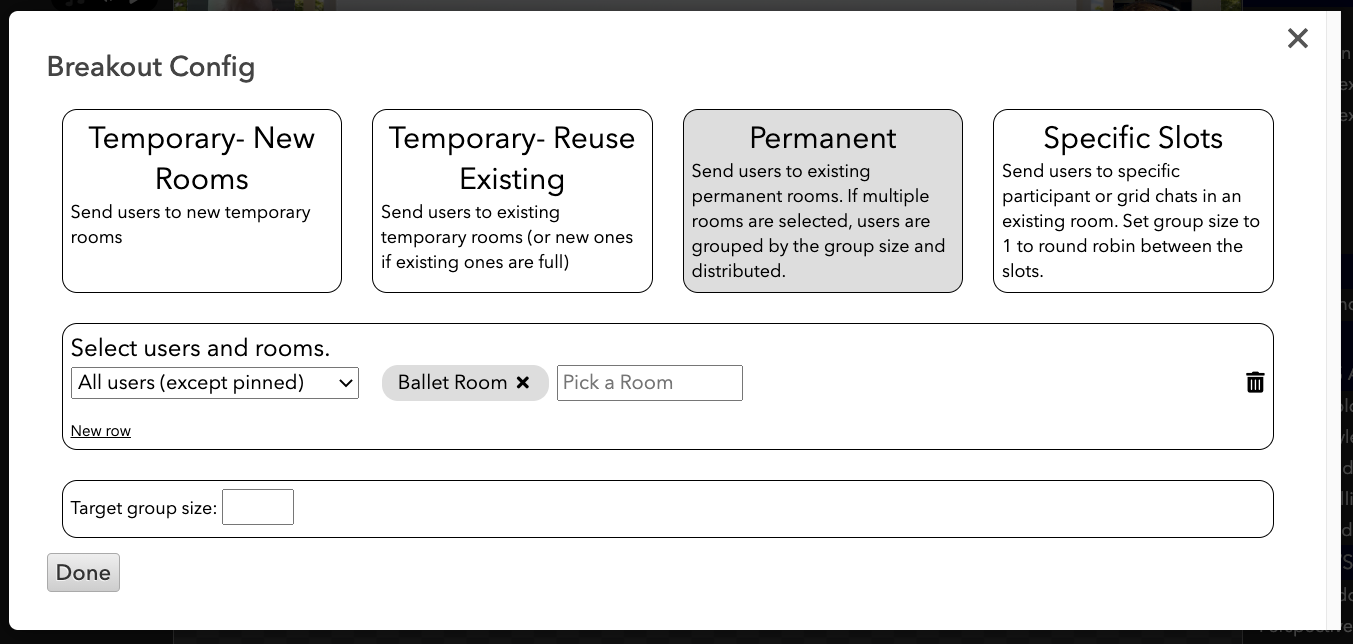
- Select "Permanent" in your Breakout Config.
- Click on "Select users..." and select "All users (except pinned)" from the dropdown.
- Click on "Pick a Room" and select the room that you want to bring your guests to.
- Click "Done" to save.
To turn off the message that pops up when you click on your button, asking "Are you sure you want to do the breakout?", you can click on "For all users only" next to "Confirm on Run" and select "No."
Bring All Here via menu
As an admin or director, you can quickly bring all users in the workspace to the current room you are in from the menu bar, under Users -> All Users in Workspace to this Room. If you don't have a preconfigured breakout button, this is a quick alternative option.
📌 Pinning
Pinning someone to a specific room means that you're tying them to that room and exempting them from all breakout buttons.
Only people who have Admin Access or Director Mode-Only access have the ability to pin.
How to pin a guest (or yourself) to a room:
- Look to the left-hand room navigator list.
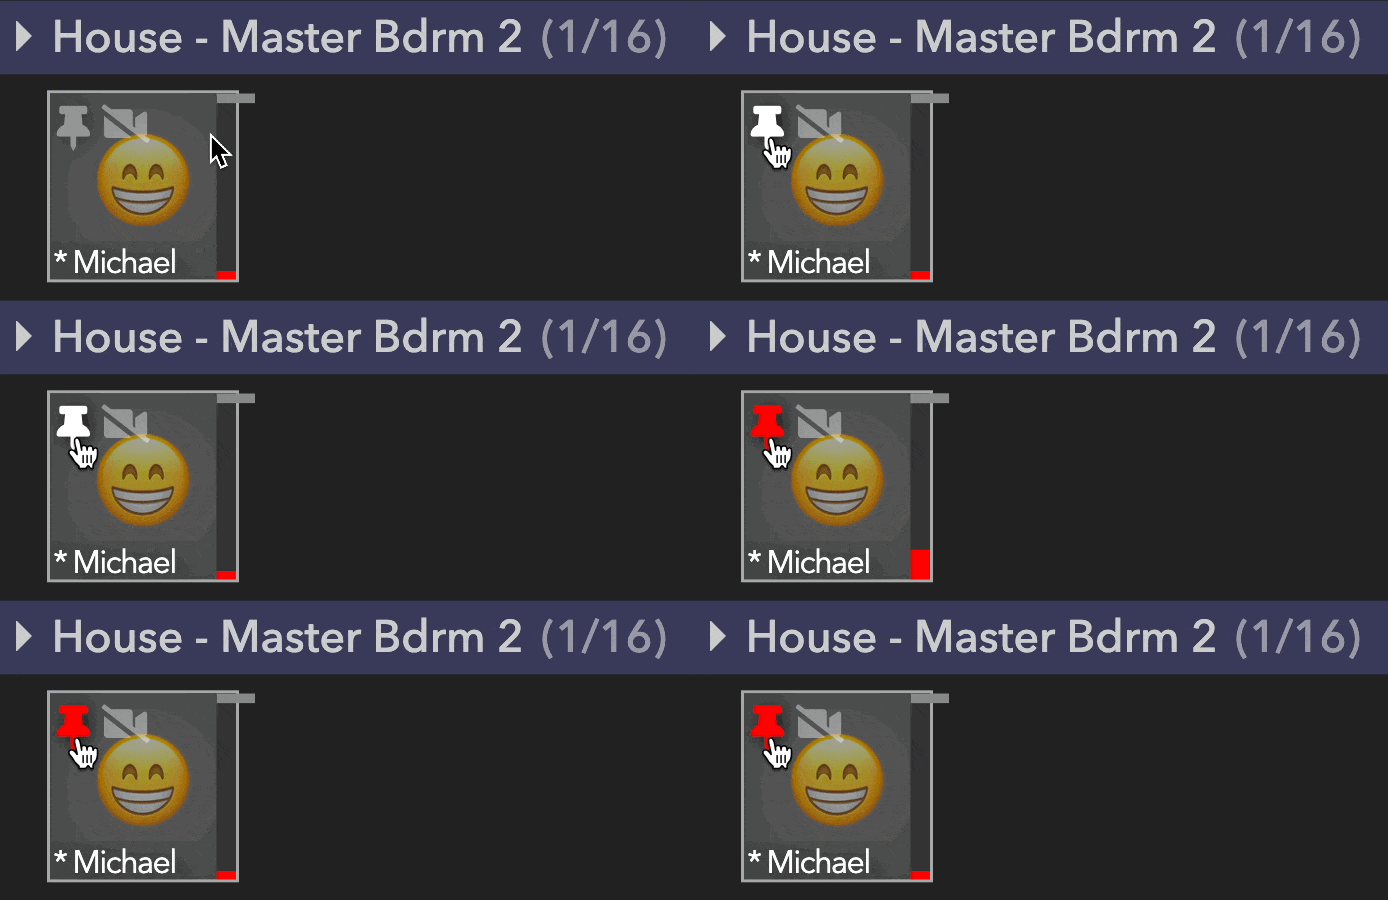
- Click on the pushpin icon in the top left of a participant preview; it should turn red.
Now, your guest will not be able to move out of that room. This feature is especially helpful when you want to pin breakout room hosts to rooms before running a breakout session.
Break Out a Set of Rooms
Sometimes, it is useful to treat a set of rooms as a breakout target.
For instance, you may have a template room A that links to room B. When you create a copy of A, you may want to link to update so that it links to a copy of B.
This is useful for creating an escape room experience where multiple teams move through a set of escape rooms independently.
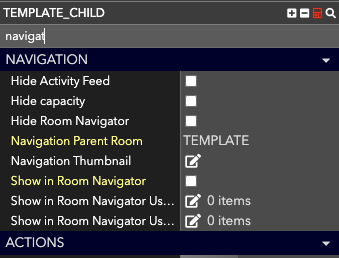
In order to link two breakout templates into a set, you need to set the Navigation Parent Room to a room that is in your breakout set. In the example above, the Navigation Parent Room for room B would be set to room A.
Navigation Parent Room
The Navigation Parent Room option only appears for elements that have "Show in Room Navigator" disabled.
Updated over 3 years ago
