Platform Updates
Latest updates to ohyay studio, published in the #platform_updates channel on our Discord (https://discord.gg/88AwHjBvns) and now on our blog (https://ohyay.co/blog).
Blog post: https://ohyay.co/blog-post/whats-new-in-ohyay-toolbar-layers-user-manager-and-more
- We've introduced a toolbar at the top of ohyay that provides more convenient access to the most commonly used configuration properties, such as adding user slots and changing the background of your room.
- The toolbar changes depending on what you click on (e.g. the room canvas vs. an element).
- You should be able to build out your event space by primarily using the toolbar, but you can still access the properties panel by clicking on Advanced on the top right corner of your screen.
Using layers makes managing elements, particularly in a complex space, faster and easier. If you’re familiar with layers in Photoshop or Illustrator, they should feel very similar in ohyay.
Note that layers have replaced the arrow next to your room name that previously allowed you to see all of the elements in your room.
New BREAKOUT BUTTON
- We updated the breakout dialog to make running breakouts more intuitive. In the new dialog, you’ll now see clear options to choose who you want to move and where you want to move them to.
- In many virtual events, breakouts are an important part of facilitating connection and creating stronger bonds among guests. They’re initiated by creating a “breakout button,” which holds the logic for the desired form of breakout. Clicking this button during an event will cause the logic to run.
- Click on Users > Manage Users from the menu to see a new dialog with tabs for Admins, Invited Users, Attendees, and Manage Tags.
- You can now add a user as an admin to your space, email a user with an invite, bulk upload a CSV of users and their tags, and manage both system and custom tags — all in one place.
New Workspace Gallery
- Our refreshed Workspace Gallery page features video tutorials, resources, and importable workspaces for easier onboarding.
- The Workspace Gallery now allows you to star workspaces and keep them sorted at the top of your list, sort by owner/date accessed/title, search for workspaces by title or owner, open your workspace in a new tab, and easily jump between projects.
Manage Events
- We’re experimenting with a new way to create registration pages directly in ohyay.
- Click on Workspace > Manage Events, click on New Event, fill out your event details (e.g. start and end time, description), and upload your hero and background image.
- You’ll get a link to your registration page, where your guests will be able to register for your event and add it to their calendar.
Buttons Triggered by Speech Recognition
- We've introduced an experimental feature where action buttons can be triggered by users saying specific words or short phrases.
- Click on your action button to pull up its properties. Edit the Voice Triggers property under the Interaction category to add words and phrases that can be spoken to run the action.
Whispering → SIDE CONVERSATIONS
- At any gathering, it is natural to break into small groups. One way to accomplish this in ohyay is to separate into different rooms, but the sense of community is lost.
- With side conversations, users can seamlessly break into small groups without leaving the current room. There is currently no limit to the number of people you can invite to your side conversation.
- You can start a side conversation with another user by clicking on the chat messages icon that appears at the top of their user element while hovering over it.
New USAGE REPORT Feature
- Under the Workspace menu, admins can now pull a basic usage report on an event space for specified date/time range and download it as a separate file for import into a spreadsheet.
- Go to Workspace > Usage Report from the menu. Click on Usage Report. Select the times and dates of the time period for which you'd like to run the report. Click on Get Room Usage (to get data on unique users, time per user, total time) or Get Reaction Emoji Usage (to see the number of reactions used per minute).
- Note that you'll want to check the box next to Collect Reaction Usage in your Workspace Settings before your event, in order for the reaction emojis to get recorded.
- Click on Download Report to download your report as a CSV file.
Control Positioning/Sizes of Automatic SCREEN SHARING
- You now control how the automatic screenshares are positioned and sized in your room.
- Look for the Screenshare X Offset, Y Offset, Width, and Height under the Participant Media category of your Room Settings and adjust the sliders.
New DROPDOWN ELEMENT
- Our new Dropdown Element lets you execute an action based on a selected room, user, or custom option, which can be useful for choosing rooms to navigate into or setting up targets of your action buttons.
Question Board Element Updates
- Question board elements al[low users to post questions as well as to update and downvote existing questions. They’re most commonly used in classroom and panel spaces.
- You can now mark questions in Question Boards as Answered by hovering over a question and clicking Answered. To show all answered questions, hover over the question board element and click show answered questions.
ROOM PREVIEW Elements Now Have Fit Width and Fit Height Scaling Modes
- Insert a Room Preview by going to the Element menu > All > Room Preview or Element > Embeds > Room Preview. Room previews are live feeds of / automatic links to rooms in ohyay.
- Click on the Room Preview element to pull up its settings in the right-hand menu. Under the Element category, click on Auto next to Scale Mode and select either Fit Width or Fit Height.
Enable User Editing Updates
- The SLIDESHOW element now supports image uploads via Enable User Editing. Click on your slideshow to pull up its settings in the right-hand panel and check Enable User Editing under the Interaction Category. Your guests in Viewer Mode will now be able to hover over your slideshow and upload their own images upon seeing the arrow at the bottom appear.
- Images uploaded to IMAGE elements (via Enable User Editing) are now available as assets in the Asset Library. Access your Asset Library — the collection of all the assets in your space.
Published Workspaces Now Support Auto-Updating
- Imported versions of workspaces will check for new versions and prompt admins.
MEETING MODE Paging is Now Unsynchronized
- When you set a Multiuser Element to Meeting Mode, every user who is speaking will be heard (even if they’re off screen) and will come on screen if there is capacity.
- Now, Meeting Mode paging is unsynchronized, so each user will be looking at different pages of people.
Blog post: https://ohyay.co/blog-post/whats-new-in-ohyay
Create Automatic Calendar Invites with ohyay Links
- Click on the settings gear in the top right corner of your screen to pull up your settings.
- Click on the calendar icon of your choice (e.g. Google, Outlook) to automatically generate a calendar invite with your workspace name and vanity URL (https://docs.ohyay.co/docs/vanity-url) or default workspace link.
Audio Only Screen Share
- Click on the down arrow next to the screen share icon at the top right of your screen and select Audio Only from the dropdown. Click Start.
- Continue following the standard screen sharing steps (https://docs.ohyay.co/docs/screen-sharing). (Select whether you’d like to share your entire screen, a window, or a Chrome tab and click Share).
New Icons for Background Segmentation + Element Deformation
- We added new icons to the toolbar to increase discoverability of background segmentation (https://docs.ohyay.co/docs/segmenting) and element deformation (https://docs.ohyay.co/docs/deformation)
- Hint: you can also deform an element by clicking on it and holding down “D.”
Hide Individual Elements in Recordings and Photo Booths
- You can now hide individual elements in recordings (https://docs.ohyay.co/docs/recording-streaming) and in photo booths (https://docs.ohyay.co/docs/take-picture).
- Select the element to pull up its settings in the right-hand panel. Check the box next to Hide in Recordings under the Advanced category.
New Slideshow Transitions
- From the menu, go to Element > Media > Slideshow to insert a slideshow element, which allows you to easily flip between images in a sequence (https://docs.ohyay.co/docs/slideshow).
- You now have additional options for slide transitions. Under the Element category of the slideshow’s settings, select Fade next to Slide Transition and choose either Immediate or Blur from the dropdown.
“Blur” Room Transition
- We added a new “blur” room transition (https://docs.ohyay.co/docs/transitions), so that users will see a blur effect upon moving into your room.
- From the menu, go to Room > Settings or click on your room in the Rooms List to pull up its settings. Under the Appearance category, select Cross Fade (the default room transition) next to the Room Transition property and select Blur from the dropdown.
“Search for Docs” Under Help Menu
- From the menu, go to Help > Search Docs… and search for the topic in our documentation (https://docs.ohyay.co/) that you’re looking for.
- Let us know if nothing comes up in your search and we will add a doc for you.
“Stop All Shouts” Under Users Menu
- In ohyay, “shouting” means clicking on the megaphone icon at the top of your Rooms List and coming up on the top of the screen — usually to make an announcement (https://docs.ohyay.co/docs/shouting).
- From the menu, go to Users > Stop All Shouts to immediately stop all shouts across your entire workspace.
Back by Popular Demand: “All” Category Under Elements Menu
- From the menu, navigate to Element > All to view all uncategorized elements in ohyay.
Reaction Emoji Speed
- You can now control the speed at which reaction emojis rise up in your room.
- Navigate to your Room Settings (Room > Settings), look for Reaction Emoji Speed under the Reactions category, and adjust the speed on the slider.
Target Reactions by Tags on Rooms
- You can now send reactions from a specific room to rooms with specified tags.
- Under the Reactions category in your Room Settings, type in the room tags that you’d like to target next to Reactions Target Room Tags. (To add a tag to a room, click on the pen icon next to Tags in your Room Settings and add your desired tags).
Workspace-Wide Settings for Audio Reactions and Audio Reaction Volume
- You can now turn on audio reactions (emoji reactions that make sounds, like the clapping emoji) and adjust their volume across your entire workspace.
Bot Snapshot Element
We added a new element type called Bot Snapshot, which saves out the full state of bots in your space, including their name, video, and the slots in which they appear. This is huge for advanced developer productivity and for sharing.
- From the menu, go to Element > Advanced Elements > Experimental > Bot Snapshot to add a Bot Snapshot.
- Add test bots (https://docs.ohyay.co/docs/testing-with-bots) to your workspace by navigating to your Workspace Settings and clicking on Create next to Create Test Bot under the Actions category.
- Click on your Bot Snapshot element and on Take next to Take Bot Snapshot under the Actions Category of the Bot Snapshot’s properties.
- Clear out the bots by navigating to your Workspace Settings and clicking on Remove next to Remove All Test Bots.
- When you are demoing or cloning a space for someone, click on your Bot Snapshot element again to pull up its settings. Click on Restore next to Restore Bot Snapshot and they'll all come back.
Selected Users in Rooms List Now Get an Outline
- Select a user’s thumbnail in your Rooms List and you’ll notice that a blue outline will appear around their thumbnail.
Hit “Enter” to Apply Your Element Crop
- Now, when you go to crop an element, you can hit “Enter” to automatically crop it.
New Shortcuts: Cmd-P, Cmd-K, and Cmd-O
- Cmd-P: Search for users, rooms, elements, or actions across your workspace. Also under View > Command Palette in the menu.
- Cmd-K: Search for and switch rooms. Also under View > Room Switcher in the menu.
- Cmd-O: Search for elements in your room. Also under View > Element Chooser in the menu.
Mute a User’s Mic & Camera in a Single Action
- Right click on a user to pull up its context menu. Select More User Actions > Turn Camera and Mic Off.
Quickly Find/Highlight Items in Context Menus
- When you right click on anything in ohyay, it pulls up a context menu. You can now type letters when the context menu is open to quickly find/highlight items and use your kecyboard to navigate/select.
- This is handy for large menus (e.g. Send to Room, Quick Add Tags, etc.)
Chat Elements Now Allow Markdown for Formatted Messages
- Check Allow Markdown in your chat element’s settings.
- In Viewer Mode, your guests will be able to type Markdown, a lightweight markup language, into the chat element. You can find a cheat sheet for Markdown here: https://www.markdownguide.org/cheat-sheet/.
Popped Out Windows (via Enable Pop Out) Remember Their Position + Size
- Check Enable Pop Out in your element’s settings to enable it to pop out into a separate window. (See our last platform updates for more info on pop outs!)
- Try opening, resizing, and closing a pop out. When you open the pop out again, it will remember its position and size.
New Property to Add Descriptions to Landing Page
- In your Workspace Settings, you can now enter a description for your landing page (the first page that your guests see when they go to your space). See our last platform updates for more info on landing pages.
- Your description will show up under your space name.
New Actions: Navigate Users to Next/Previous Rooms
- In your Room Settings, there are new actions to Navigate Current User Next (move a user to the next room in the Rooms List) and Navigate Current User Previous (move a user to the previous room).
Repeat Action on Buttons Now Works for Rooms
- You can now check Repeat Action for buttons targeted to rooms. Can be used for anything really — like flashing a background color in your room.
All Elements Now Support Enable Pop Out
- All elements now support Enable Pop Out. Click on an element, search for Enable Pop Out under the Interaction category in its settings, and check the box next to the Enable Pop Out property.
- Pop outs are useful for end users who want to see a screen share, poll, or another element close up.
- Pro Tip: While moderating an event or class, you can pop out room previews, question boards, etc. into separate windows to monitor everything more closely.
Override Element
- We added a new override element that lets you conditionally set overrides on properties. Similar to an apply-on-condition button, but you check a box vs. add a condition.
- To add an override element, go to Element > Buttons > Override from the menu. Check Override On to apply your action to whatever element you choose.
Target Workspace Properties via Action Buttons
- We added the ability to target your Workspace properties and actions via Action Buttons, so you can now change any of your Workspace Settings via a button.
- Especially useful for clearing all chats in a workspace (https://docs.ohyay.co/docs/chat-1#clear-chat-action-button) or sending workspace-wide announcements (https://docs.ohyay.co/docs/announcements#annnouncement-action-buttons).
Send Announcement ➡️ Workspace Settings
- We moved the Send Announcement property (https://docs.ohyay.co/docs/announcements) from the Room Settings to the Workspace Settings.
Wrap Names in Participant Count/List Element
- You can now wrap long names in the Participant Count/List element.
- Add a Participant Count/List element by clicking on Element > Participants > Participant Count/List in the menu. Set your participant count/list to Names or Names in Columns and check Wrap Names.
Click to Mute on Volume Slider
- Now, when you insert a video element, show its controls, and go into Director Mode, you’ll see that the volume slider supports clicking to mute.
Room List Updates
- In the Workspace Settings, you can hide Room Thumbnails in the Room List and choose a font for the Room List.
Question Board Text Now Selectable
- Text in the Question Board element is now selectable for copy/paste.
- Navigate to Element > Interaction > Question Board to add a question board element.
Formatted Text Now Allows Scrolling
- Allow Scrolling now works with Formatted Text on the Text element.
✳️ Show Only Modified Properties ✳️
- We added a new Show Only Modified Properties option as a new way to review spaces. Click on the asterisk at the top right of the Properties Panel to see only the properties that have been edited.
- In this mode, searching via the search bar will still return all properties, even if unedited.
Use shortcut Cmd-? to immediately begin typing in the property search bar.
🛬 Landing Page 🛬
- We redesigned the default landing page to allow you to change your name, subtitle, camera, mic, and speakers.
- You can fully customize the look and feel of your landing page by editing its properties (e.g. font, background color) in the Landing Page category of the Workspace Settings.
🔒 Lock Elements with the Context Menu 🔒
- You can now right-click on elements to automatically lock and unlock them.
🔄 Allow Rotation in the Editor 🔄
- You can now rotate an element by clicking and dragging on its rotator, without having to go into its properties.
- Element Menu: We organized the Element Menu into categories (including Participants, Buttons, Media, Interaction, Time, etc). Let us know if you have any suggestions for organization or alternate category names.
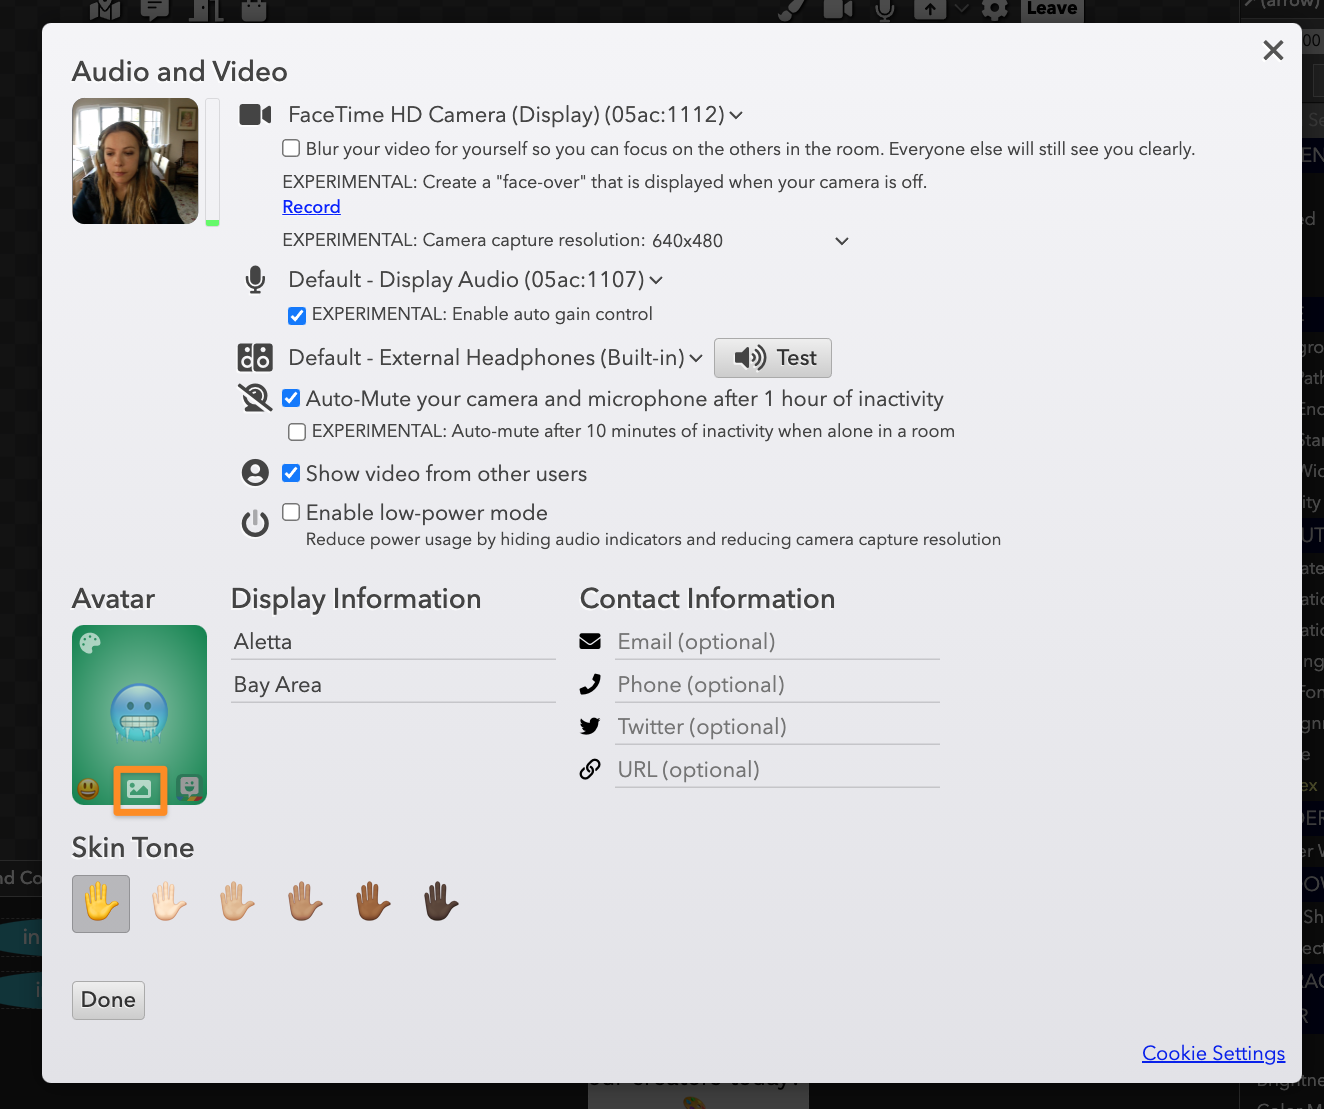
- Custom Avatar Color: You can now change your avatar color by: clicking on your settings wheel on the top right of ohyay studio, clicking on “Profile & Other Settings,” and clicking on the palette icon on the top left of your avatar.
- Upload Profile Image: You can now upload any image that you want as your avatar by: clicking on your settings wheel, clicking on “Profile & Other Settings,” and clicking on the image icon between the emoji and Bitmoij pickers.
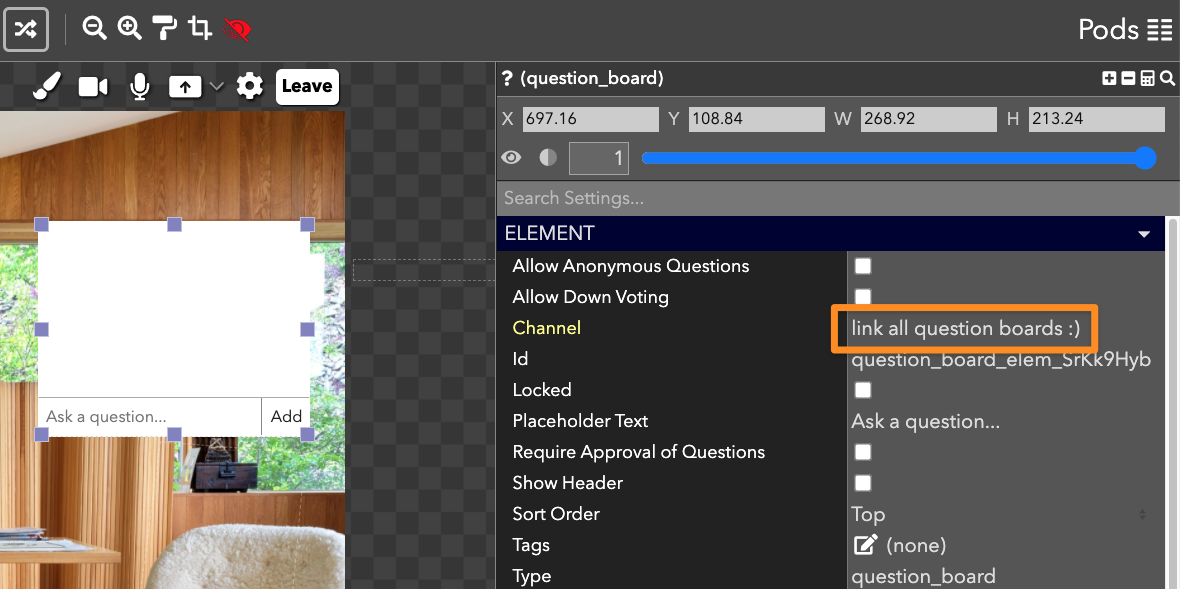
- Link Question Board Elements: You can now link question boards across different ohyay rooms. Simply enter the same channel name (in the question board’s settings) to the question boards that you want to link together.
- [Experimental] New “Selector” Mirror Mode on Participant Element and Multiuser Video: A new, flexible way to select participants from anywhere in the workspace — filtering by room, element, and/or user tags.
- Support for Closed Caption Files on Pre-Recorded Videos: Add an SRT, VTT, or another supported caption file format to display on your video via the Video Captions URL property.
- Support for Scalable Room Previews with Scroll Bars: You can now control the scaling of your Room Previews so they can be scrollable by: choosing the Manual option on the Scale Mode property, modifying the Scale property, and enabling horizontal and vertical scrollbars. This can be useful for larger informational displays or images where you need users to be able to scroll.
- Crop Tool: We added a crop tool that you can use to crop elements.
- New Audio Reaction: 🥂🥂🥂Champagne glass clinking!
- Waiting List: We added a “Go to Room” feature on the waiting list element. Check the box next to “Enable Go to Room” in the waiting list element’s settings to see a “Go to Room” button pop up next to a person’s name.
- Countdown: You can now use the “Seconds Remaining” property on countdown timers in button conditions.
- Participant Count: We added a way to show subtitles on participant counts. To show subtitles, change the display mode of the participant count to any option with “names” and check the box next to “Show Subtitles.”
- Question Board Element: You can now sort question boards by votes or by most recent questions and download the contents of a question board as a CSV.
- Text Announcements: You can now create action buttons that send pre-configured text notifications to your workspace and include links to rooms. The syntax to send links to rooms is: number_seconds,text with [link text](the link).
- Auto-mute When Alone: We added a new option in your user profile to mute after 10 minutes of being alone in a room.
- Edit User Subtitles: You can now change a user’s subtitle in the editor.
- Pasted Hover Actions: Hover actions on pasted elements now get updated to point to the newly pasted element instead of the original element.

- Automatic Backups: We now automatically back up your workspaces, available under Workspace Versions in your Workspace Settings. Click on a backup name from the list to restore your space to a previously saved version.
- New Context Menu Items: We added new context menu items when you right-click on rooms, elements, and participants. You can now remove elements, record your room, make all people in a room follow you, and more.
- Spatial Audio Silence Distance: We’ve added a new configuration for Spatial Audio Silence Distance, the cut-off for silencing participants based on distance. You can now use it along with Spatial Audio Full Volume Distance to better control how loud the audio is. Read more on Spatial Audio Volume here: https://docs.ohyay.co/docs/spatial-audio-volume.
- Keyboard Shortcuts: We added some keyboard shortcuts for selecting the workspace (F1), room (F2) and element (F3). We hope that you find them useful when looking at settings for the right object. Also, for anyone that uses the settings search, you can now hit Cmd-? to quickly jump to it.
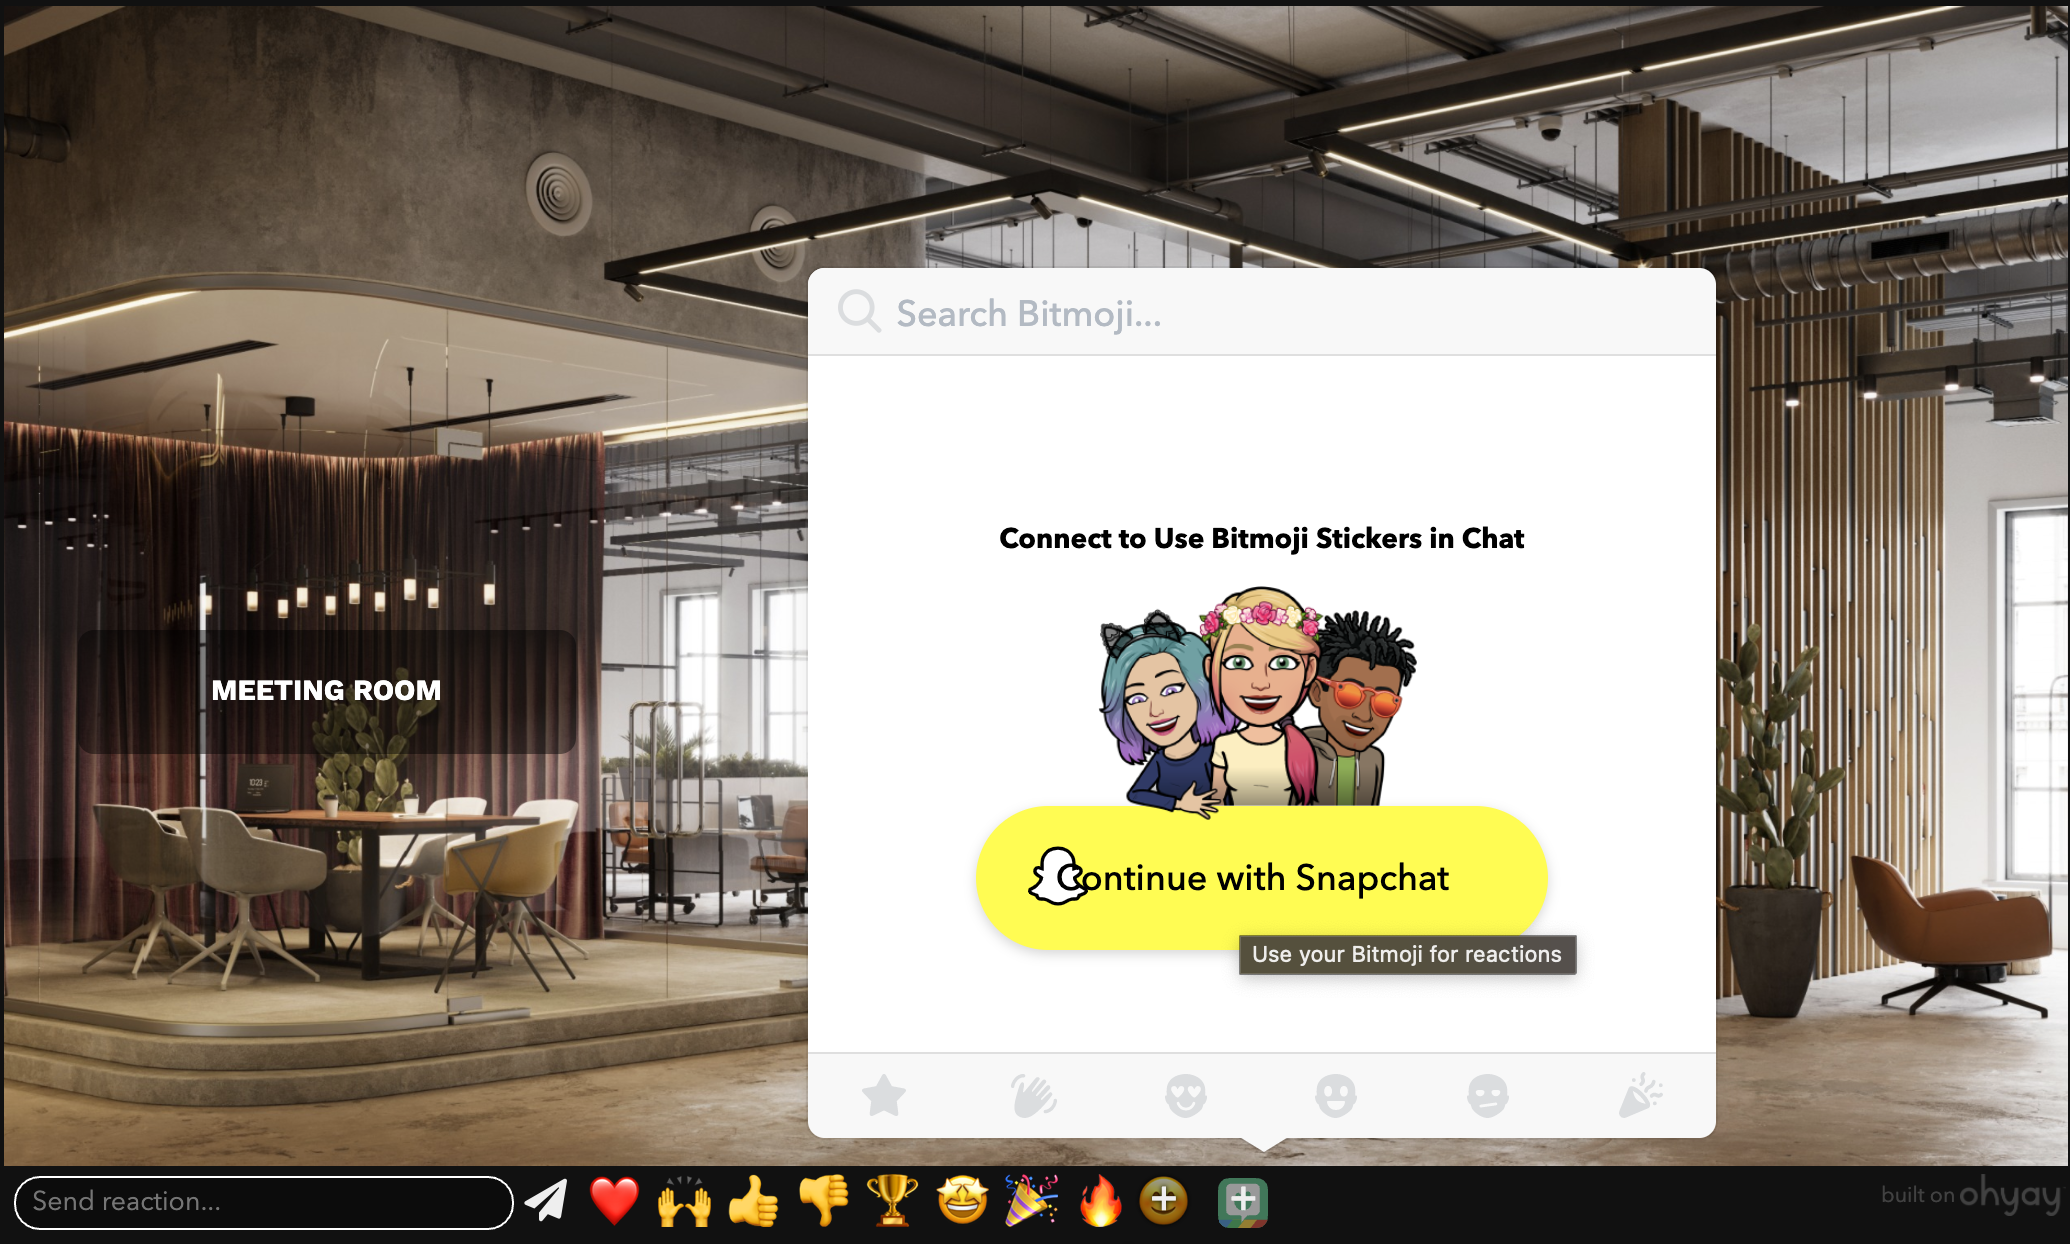
We’re excited to share that we’ve integrated with Bitmoji, so you can now change your avatar to a Bitmoji sticker and send Bitmoji stickers as reactions.
- Bitmoji Avatar: Click on your settings wheel and navigate to Profile & Other Settings. Click on the Bitmoji icon and “Continue with Snapchat” to authorize the application. Choose a Bitmoji sticker as your avatar.
- Bitmoji Reactions: Click on the plus sign in the reactions bar and choose a Bitmoji sticker to send as a reaction.
- Toggle Element: Click on “Element” > “Insert Element” > “Toggle” in the menu to add a toggle element, which is essentially an interactive switch. By default, it is off; when a user clicks the toggle, it will switch to on. More info here: https://docs.ohyay.co/docs/toggle.
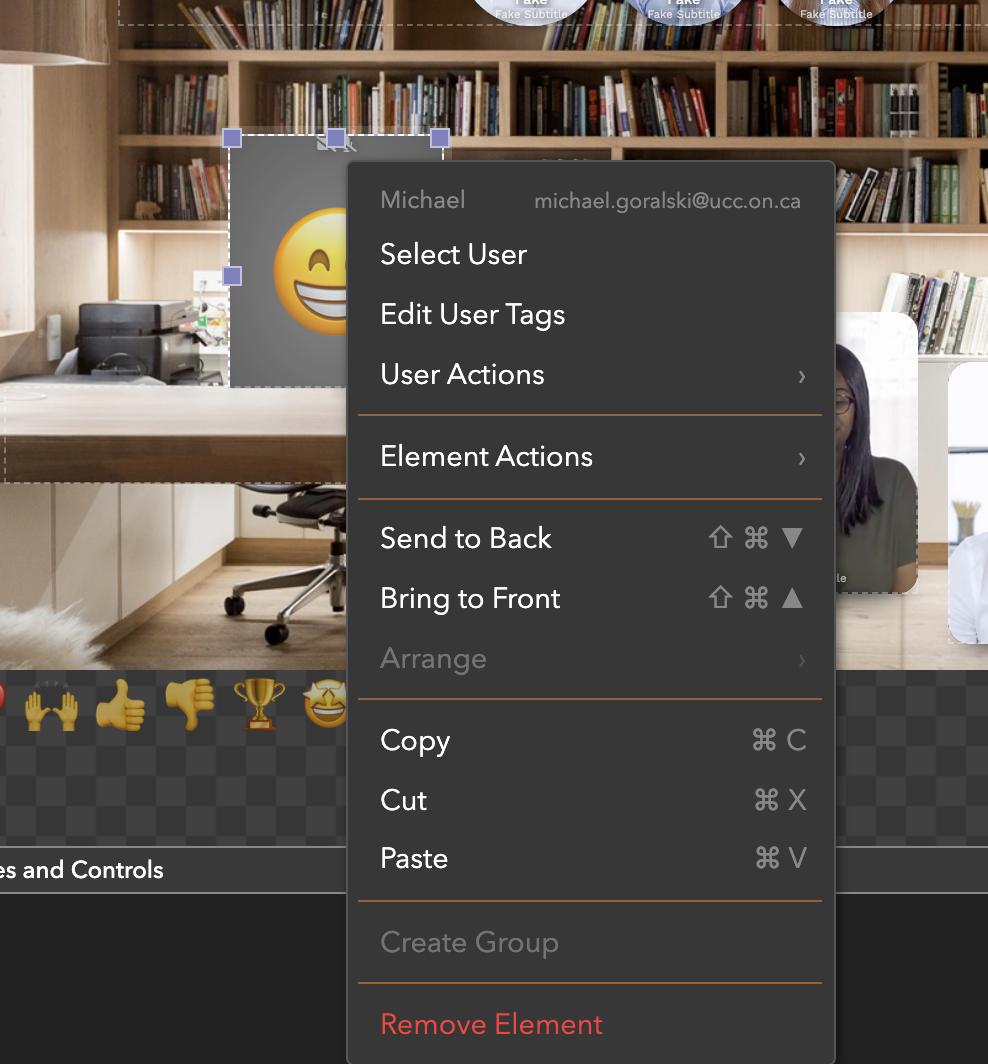
- User Context Menu: Right click on users to see a context menu with options to edit user tags, invoke user actions (e.g. Start Screenshare, Turn Mic Off), and more.
- Element Context Menu: Right click on elements to invoke element actions (e.g. Delete, Snapshot Layout).
- Room Context Menu: Right click on rooms in the Rooms List to pin all users, move a room up or down in the list, edit properties, and more.
- Stealth Mode: We added better Stealth Mode indicators in participant thumbnails in the Rooms List.
- Screensharing: Participants now display above screenshares in the default screenshare layout (for better ergonomics).
- Background Property: Background property now supports any CSS styling (eg. “linear-gradient(90deg, rgba(2,0,36,1) 0%, rgba(9,9,121,1) 35%, rgba(0,212,255,1) 100%”).
- New "Overlaps with Element" Condition: We added an "overlaps with element" condition in the Condition Builder (https://docs.ohyay.co/docs/action-button#conditions). Especially useful for escape room building.
- Full Screen Button: There's now a full screen button in the settings menu. (Click on the settings gear in the top right to access your settings).
- Context Menu: We added a new context menu (with "Send to Back," Bring to Front," and "Arrange") when right-clicking elements.
- Play/Pause Videos: You can now set up your action buttons (https://docs.ohyay.co/docs/action-button) to play/pause videos.
- Add Time: There is now an "add time" action on stopwatch (https://docs.ohyay.co/docs/stopwatch) and timer (https://docs.ohyay.co/docs/timer) elements.
- Slideshow: We added admin-only controls on slideshow elements (https://docs.ohyay.co/docs/slideshow).
- User Properties: You can now update user properties in action buttons (User > Current User > set > All Properties).
- Property Pointer Events: We added new property pointer events which can block or pass through clicks to elements underneath. Set “Default Pointer Events” to “Auto” in your element’s settings.
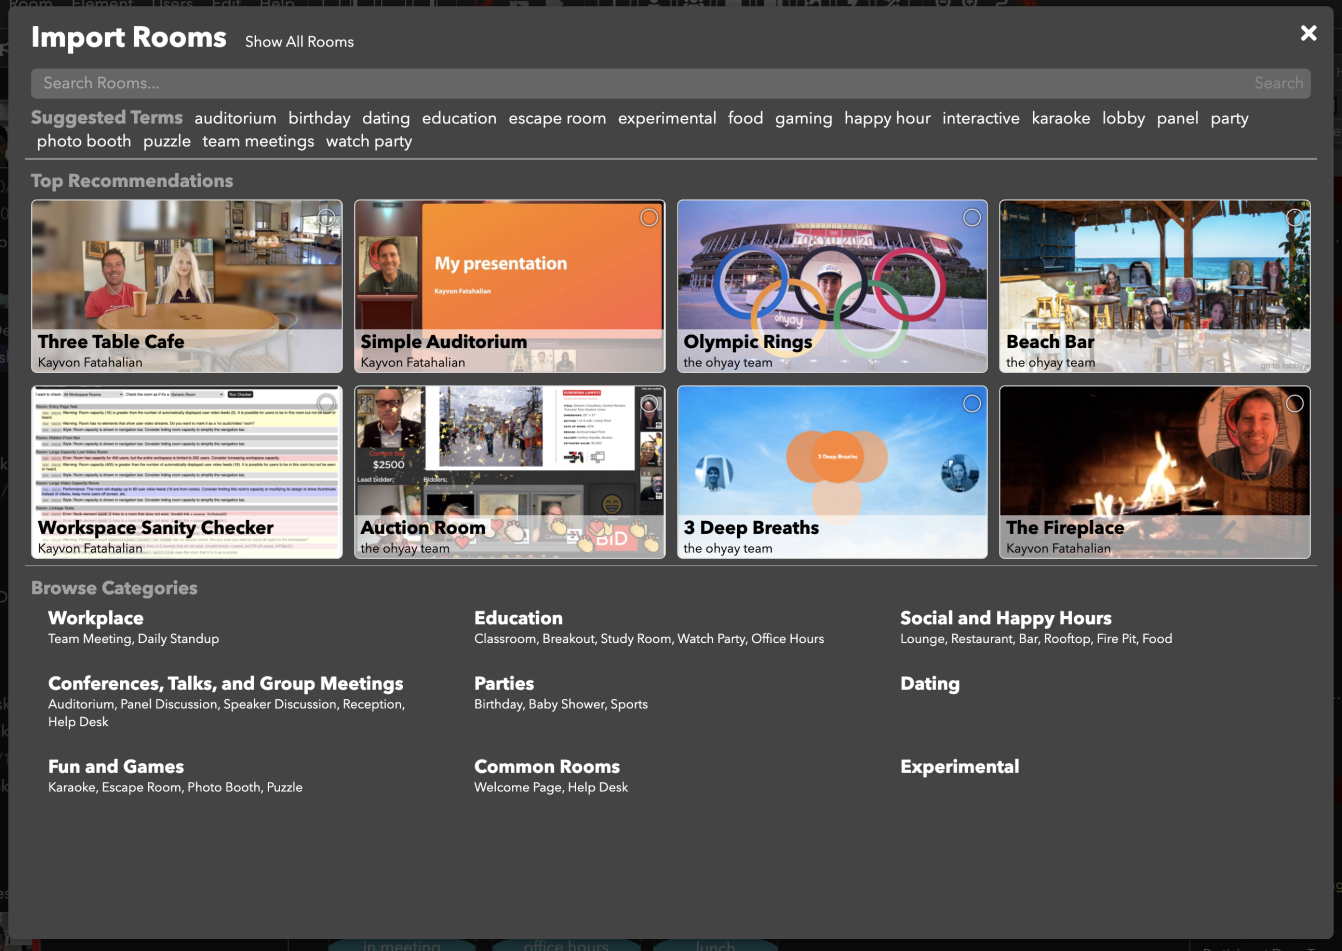
- Room Gallery: Open up your ohyay workspace and go to Room > Import Room to see our redesigned Room Gallery with top recommendations, categories, multi-add, and filters by creator (more info here: https://docs.ohyay.co/docs/publishing-rooms). Publish a room (Room > Publish Room) and let us know what you think!
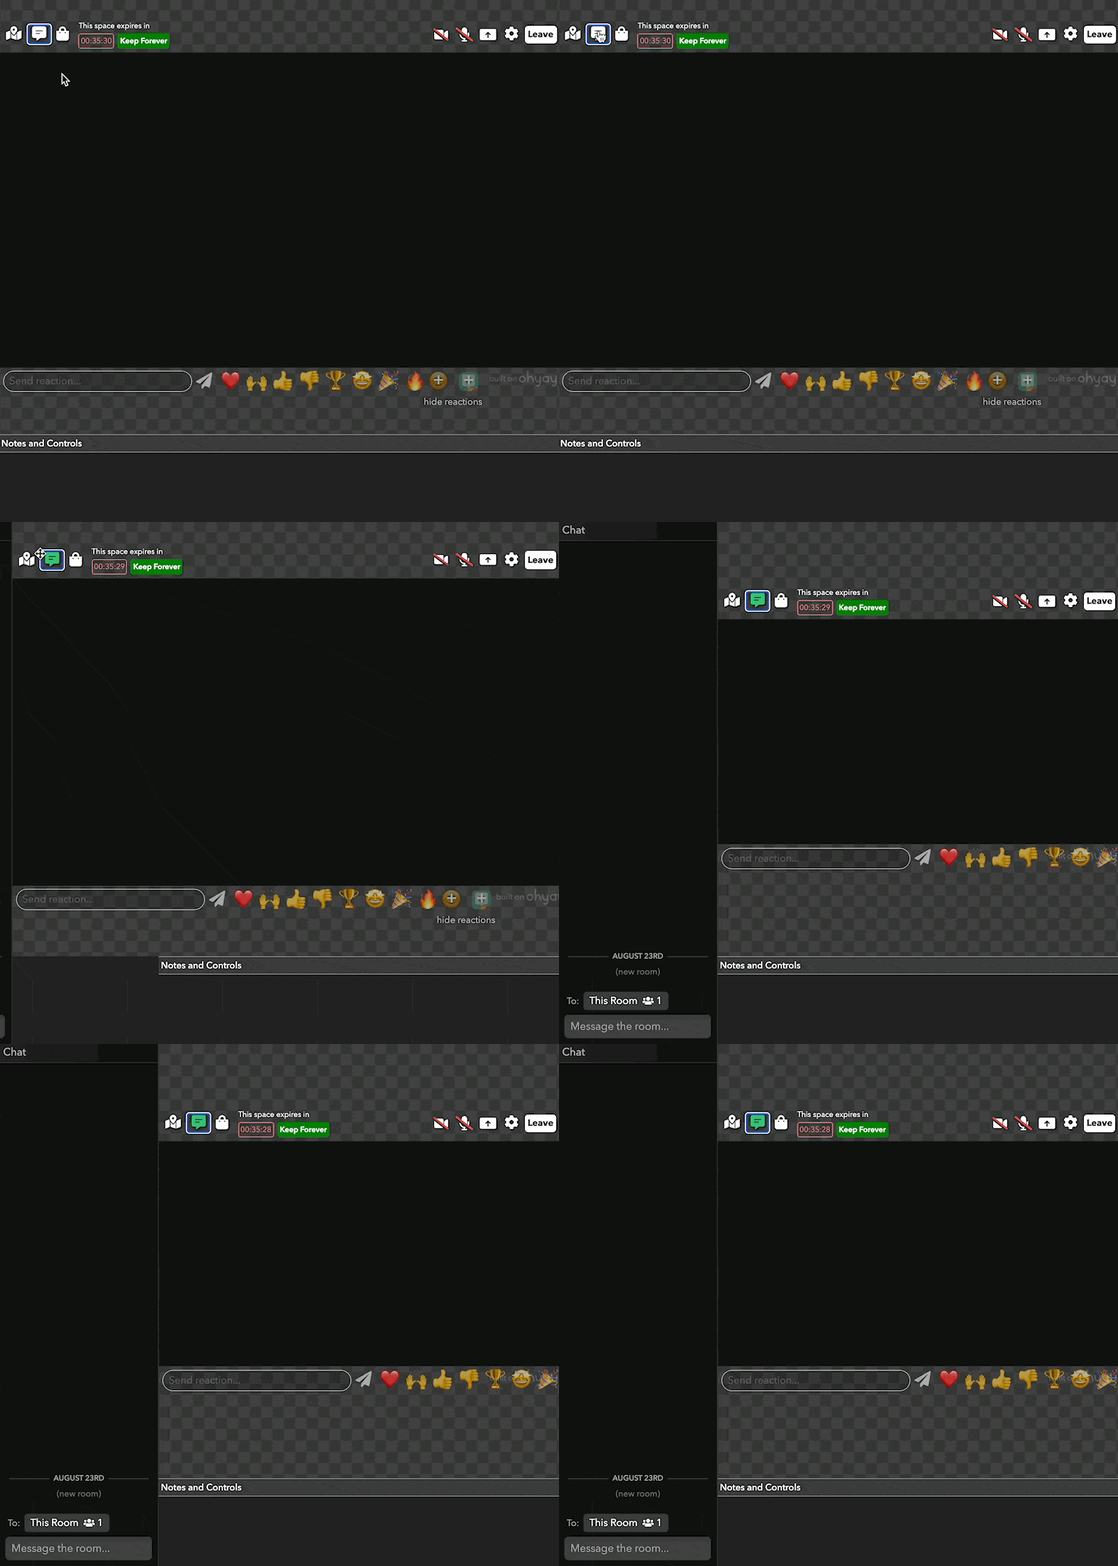
- DMs: Participants can now shout and DM people using the Enable Chat Bar. (To turn on chat, click on the chat icon next to the backpack icon in the top left corner of the tool).
- Chrome Update: The latest version of Chrome is introducing issues with audio/video for spaces with many participants and videos. Fixes to Chrome should be coming on 8/5.
- Resizing: You can more easily resize elements that are rotated, deformed, skewed, etc.
- Drag & Drop Multiple Rooms: You can now drag & drop multiple rooms in your Rooms List at a time.
- Folders: Folder expansion state is stored per user now. When you expand a folder of rooms, it'll expand just for you.
- Breakout Buttons: You can now customize the prompt used by Breakout Buttons that are configured for inviting/selecting users.
- Restrict Workspace-Wide Chatting: We added “Restrict Chatting to Everyone User Tags” in Workspace Settings (e.g. if you only want admins to send chats to the whole workspace, put admin in that setting).
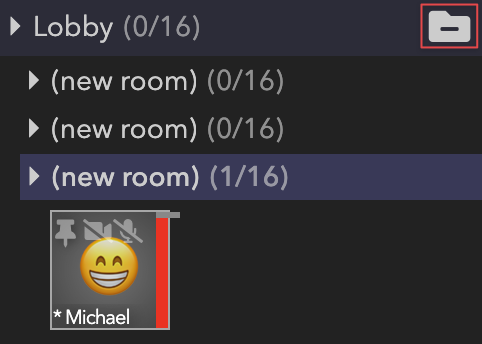
- Rooms List Folders: You can now organize rooms in your Rooms List into folders. Check “Is Folder” in a room's settings to make it a folder. You can drag rooms into the folder and click on the folder icon to collapse/expand folder rooms.
- Editable Text Elements: Text elements have a new setting for "User Edit Only for Current User" that is useful for user-editable forms.
- Layout Buttons: You can now specify which properties to update when you use the “Update for Layout Buttons” action (https://docs.ohyay.co/docs/layout-button#advanced-topics).
- Invalid Elements/Rooms: The Action Builder now highlights invalid elements and room references.
- Selected Users: You can now target a “Selected User in Rooms List” in action buttons.
- Breakouts: Large breakouts now run much faster. ⚡️
- Room Navigator: New “Show in Room Navigator When Empty” setting on rooms to optionally hide rooms if they are empty.
- Password: “Zoom-style” links that include an encoded password.
- New Docs: We created 45 new docs this week (https://docs.ohyay.co/). Let us know what you think and if you’d like to see documentation on a specific topic.
- New Experimental Property Editor Element: We added a new experimental Property Editor element to allow anyone to edit room/element properties. Click on “Element” > “Insert Experimental” > “Property Editor” in the menu bar and click on “(None)” in the right-hand settings panel to choose a property (e.g. “Play Room Music”). You can also try dragging a property from settings onto your canvas or Notes & Controls panel.
- Default System Chat: You can now turn on a system chat that will enable a chat bar in your room by clicking on the new chat icon (next to the backpack & door icons).
- New & Improved Room Gallery: Click on “Room” > “Import Room” in the menu bar to see our redesigned Room Gallery with multi-add and filters by creator.
- Hide Empty Rooms in Your Rooms List: You can now hide empty rooms in your Rooms List by clicking on the new “person with headset” icon at the top of the Rooms List. Handy for spaces with lots of rooms.
- Text/Image Elements: You can now add an action to your text or image elements. Edit fields also now auto-select all text when clicked.
- Layout Buttons: Layout Buttons now save all properties, allow for excluding some elements by tag, and have a convenient “Edit” mode. More on layout buttons here: https://docs.ohyay.co/docs/layout-button.
- Audience Question Board: Check “Require Approval of Questions” in your Audience Question Board’s settings to approve questions before they’re displayed. More info here: (https://docs.ohyay.co/docs/audience-question-board#require-approval-of-questions).
ohyay - Reactions: Check “Show Attribution for Emoji/Images” in the “Reactions” section of your Room Settings to show a user’s name on emoji/image reactions.
- Backpack: Create an action button that invokes removing elements from a user’s backpack. More on backpacks here: https://docs.ohyay.co/docs/backpack-item.
- Subtitle/Tagline: Require a participant to enter a subtitle by checking “Require Participant Subtitle” in the “Landing Page” section of the Workspace Settings.
- Screen Share: Create an action button that invokes asking a user to start/stop a screen share and mute/unmute.
- Background Images: Background images/colors can now be set to Cover Screen for full bleed images.
- Audio Output/Speakers: Participants can now explicitly select their audio output/speakers.
- Clear All Paint: “Clear All Paint” is now an invokable action under “Actions” in your Room Settings. More on painting here: https://docs.ohyay.co/docs/painting.
- Bugs Fixes: Improvements to playback reliability, test bots (https://docs.ohyay.co/docs/testing-with-bots), setting panel search, meeting mode, and more.
- Scrollable Notes & Controls Panel: You asked, @max delivered :slight_smile: Your Notes & Controls panel is now scrollable. Especially helpful when you’re running events with tons of buttons.
- Test Bots: We added a “Test Bots” feature to make it easier to test out workspaces. These bots have configurable names, tags, etc. Info is here: https://ohyay.readme.io/docs/testing-with-bots.
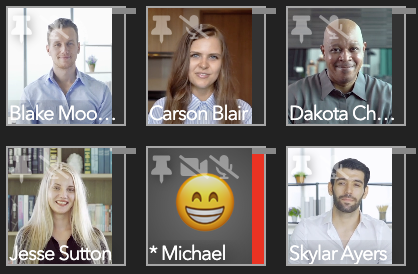
- Door UI: The Door UI now shows in the Rooms List in Editor Mode. (To turn on the Door UI, check the box next to “Show Door UI” in Room Settings).
- Door Knock: You can now respond with a message when you ignore a door knock.
- Mute Message: We now prompt users to unmute themselves if they’re speaking and their mic is muted.
- API: Iframe Javascript API now returns default values for all objects.
- Participant Count Element: We updated a few settings for participant count elements. You can now select “Names in Columns, Rows First” under Display Mode and select “Show Names on Hover” under Interaction. (To insert a Participant Count Element, click on “Element” in the menu bar > “Participant Count Element.”)
- Countdown: We added a “Countdown Completed” property for the Countdown element.
- Toolbar for Participants: We simplified the toolbar for participants. Let us know what you think.
- New Editor/Director/Viewer switcher in top toolbar: We’ve changed how to switch between modes in ohyay studio.
- Invite Only: Users can now request access to “Invite Only” workspaces.
- Stereo Microphones: We added experimental support for stereo microphones.
- Screen Share Audio: You can get higher quality screen share audio by holding down Cmd/Ctrl and clicking on the screen share icon.
- Backpacks: New “User does not have backpack item with tag” condition.
- Breakout Buttons: Breakout room time to live now supports partial minutes (e.g. 1.5 minutes).
- Text Reactions: Text reactions placeholder text (“Send reactions”) can now be modified in Room Settings under “Reactions."

- User Emails: User emails now show in the Invite Manager.
- Contact Info: Your contact info in settings now includes a URL field. (You can enable contact info exchange in Workspace Settings).
- Doorbells: Doorbell elements can now send emails and have a volume setting.
- Add Current User: “Add Current User” invokable for participant + multiuser video chat elements.
- Other improvements: Improved rotation in Audience Mode + performance for getRoomElements in iframe API.
- Slideshow Element: Click on “Element > Insert Element > Slideshow” in the menu bar to insert a Slideshow Element. You can directly upload slideshow assets and customize the slide count, controls, etc.
- 360-Degree Video Element: Click on “Element > Insert Experimental > 360 Video" in the menu bar to insert a 360-degree video element. (Unsynced playback/panning only for now).
- Marquee setting for text elements: Click on a text element to pull up its settings and check the “Marquee” box in the “Style” section to make your text scroll horizontally.

- Range Selection of Rooms & Elements: Hold down Shift to select a range of rooms and elements in the Rooms List.
- Editable “Completed Text” for Timers and Countdowns: You can now customize the text that appears when your timer or countdown elements are completed. Enter your preferred text next to “Completed Text" in the “Element” section of the elements’ settings.
- Backpack badge alignment/size settings: We added new options for badge alignment/height/width under the new “Backpack” category in Workspace Settings. We also published an updated backpack example in the Workspace Gallery.
- Updated Asset Manager: Our asset manager ("Workspace" > "Settings" > "Manage Assets") now supports multiple file uploads and “show recents” uploads.
- The condition “User in Element Has Tag” now works for Multi User Video Chats.
- Variety of improvements for: workspaces with lots of buttons, transcoding videos, perspective shadow angles, sorting rooms, etc.
- You can now hook up your MIDI-enabled musical instruments to trigger Action Buttons via MIDI or send MIDI messages when a button is clicked. 🎹
- We added a bring “All Users in This Workspace to This Room” item in the Users menu.
- You can now select a range of elements in the Room List by holding down Shift (Cmd/Ctrl for single elements).
- Admins/hosts can now ask participants to unmute their camera and mics by clicking on a participant element and checking “Prompt for Camera and Mic.”
- There is now a “Show Audience Count” option for Multi-User Video Chats.
- There is now a “Has Backpack Item with Tag” operator in the Condition Builder. 🎒
- You can now allow downloading of photos from a picture strip in another room.
- There is now a “Hide Room Navigation” action for rooms.
- We added a Camera Preview element that shows users themselves only.
- We added a new “popping” sound for text reactions, with an option to disable.
- We added name alignment options for Multiuser Video Chats. Click on a Multi User Video Chat and search for “alignment” in its settings.

- Various bug fixes, including bugs related to video quality, breakout buttons, and click-to-join slots.
- Exchange Contact Info: You can now enable contact info exchanges in your workspace (“Workspace” in the menu > “DEFAULTS” > “Enable Contact Info Exchange”). To send your contact info to another person, hover over their participant video element and click on the contact book icon (next to the “whisper” and “follow” icons).
- Toggle Different Panels in Creator Mode: You can now toggle the Room List, Notes & Controls, and Settings panel.
- Notification Sounds: Turn off notification/confirmation sounds (“Workspace” > “INTERACTION” > “Enable Sounds for Notifications”).
- "You are in the audience" text: Customize the “You are in the audience” text that appears in the upper right corner of the screen (“Workspace” > “DEFAULTS” > “Participant Offscreen Warning Text”).
- Room "Listening": Room “listening” is now disabled by default and can be enabled via “Workspace” > “PRIVACY” > “Enable Room Listening.”
- Recent Workspaces: Hide individual workspaces from your recent workspaces on the homepage (https://ohyay.co/home.html). Hover over the name of the workspace and click “Hide.”
- Camera Muting: We now remember camera muting across sessions.
- Layout Buttons: You can now invoke a layout button from an action button to switch your layouts. (To add a layout button, click on “Element” in the menu and select “Layout Button.” From there, click on “Snapshot” next to “Snapshot Layout" in its settings).
- Last Painted Path: There is now an "Undo Paint" invokable on the Room to remove the last painted path.
- "Has Tag" Conditions: “Has tag” conditions can now reference the values of other elements.
- Drop Shadow Spread: Grid chat participants now have a “Drop Shadow Spread” setting.
- Whispering: The whispering icon no longer flashes when you’re whispering to another person.
- Subtitles: In your participant video’s settings, uncheck “Show Subtitle” to hide your subtitle.
- Editable Text Elements: You can now change the placeholder text & color for editable text elements.
- Mouse Pointers: Mouse pointers no longer show when a creator is in Stealth Mode.
- Current User Vote: We added a “Current User Vote” property to the poll element (“Element” > “Insert Element” > “Poll”).
- Windows Picker: We added a new picker for Windows users' output devices.
- Current User Report: Click on “Users” in the menu and select “Generate User Report” to download a list of participants currently in your workspace.
- Manage Assets: We added a new “Manage Assets” menu item in Workspace Settings.
- Schedule Recordings In Advance: Click on “Workspace” and select “Manage Recordings.” Click on the + next to “Schedule” to schedule a recording.
- Turn Off Search: In the “Interaction” section of Workspace Settings, uncheck “Enable Search in Room Navigation” to turn off search in the Room Navigator.
- Restrict the Ability to Shout: In the “Interaction” section of Workspace Settings, enter specific tags next to “Enable Shouting in Room Navigator Restricted to User Tags.”
- Show Fake Participants to Viewers/Non-Admins: Add fake participants in Room Settings and check the box next to “Fake Participants Show For All Users.”
- Video Quality Override for Participant Video Elements: You can now control user video resolution per slot and corresponding camera capture resolution to support HD participants, such as presenters. In the “Playback” section of the slot’s settings, click on “Use Default Setting” next to “Video Quality Override” and select your preferred setting.
- Link Text Elements to Files: In the “Interaction” section of your text element’s settings, click on the pen icon next to “Linked Asset” to link a text element to an arbitrary file.
- Seek Specific Times in Videos: You can now create action buttons that move to specific times in videos. Your action button configuration should read like this: “Element > (Your Room Name) > (Your Video Name) > invoke > seek > (number of seconds into the video).”
- HTTP/2 support for RTC Server: Our video servers now support HTTP/2 which make them more performant.
- New Style & Layout: We updated the style and layout of the Workspace Gallery (https://ohyay.co/home.html).
- New Categories in the Room Gallery: Click on “Room” in the menu and select “Import Room” to view the Room Gallery. Click on a category name, such as “Interactive” or “Holiday,” to see rooms in that category.

Updated almost 4 years ago
